
Mastering the Node Voltage Method with 3 Practical Examples
If you’re getting into electrical engineering or just trying to get through a circuits course, chances are you’ve heard of the Node Voltage Method. It’s one of the most powerful techniques for analyzing electrical circuits, especially when dealing with complex resistor networks and multiple voltage sources.
In this post, we’re going to walk through the method in a conversational tone, break down the formulas, and go over three real examples — beginner, intermediate, and advanced — to help solidify your understanding.
What is the Node Voltage Method?
Let’s keep it simple: the Node Voltage Method helps you find the voltage at different nodes in a circuit relative to a common reference point, usually called ground.
A node is a point in a circuit where two or more elements meet.
The beauty of the node voltage method is that instead of solving for all the currents directly, we focus on voltages, which often leads to fewer equations.
The Basic Steps
Here’s a quick rundown of how the method works:
- Identify all nodes in the circuit.
- Choose a reference node (ground) — usually the one connected to the most elements.
- Assign voltage variables to the remaining nodes.
- Apply Kirchhoff’s Current Law (KCL) to each non-reference node.
- Express all currents in terms of voltages using Ohm’s Law.
- Solve the resulting system of equations.
Let’s walk through some examples.
🧪 Example 1: Beginner Level
Circuit Description:
- A simple circuit with two resistors and one voltage source.
- R₁ = 1 kΩ, R₂ = 2 kΩ
- Voltage source = 10V
- Nodes: A (between voltage source and R₁), B (between R₁ and R₂), GND (bottom node)
Goal:
Find the voltage at node B.
Step-by-Step Solution:
Let’s set ground (0V) at the bottom node. Let V₁ be the voltage at node B.
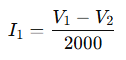
Apply KCL at node B:
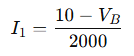
Current through R₁ from node A to B:

Current through R₂ from node B to ground:
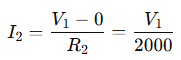
By KCL:

So:
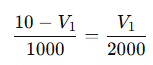
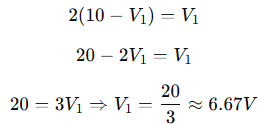
Multiply both sides by 2000 to eliminate denominators:
🧪 Example 2: Intermediate Level
Circuit Description:
- Three resistors: R₁ = 1 kΩ, R₂ = 2 kΩ, R₃ = 3 kΩ
- Two nodes (A and B), one voltage source = 12V
- R₁ connects node A to ground
- R₂ connects node A to B
- R₃ connects node B to ground
- 12V voltage source from ground to node A
Goal:
Find voltages at nodes A (V₁) and B (V₂)
Step-by-Step Solution:
Let’s use ground at the bottom. So:
- V₁ is at node A
- V₂ is at node B
From the voltage source,
Now apply KCL at node B:
Current from A to B through R₂:
Current from B to ground through R₃:
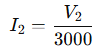
KCL at node B:
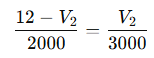
Multiply both sides by 6000:
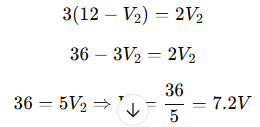
So:
- V₁ = 12V
- V₂ = 7.2V
🧪 Example 3: Advanced Level
Circuit Description:
- Four resistors: R₁ = 1 kΩ, R₂ = 2 kΩ, R₃ = 3 kΩ, R₄ = 4 kΩ
- Two independent voltage sources: V₁ = 10V, V₂ = 5V
- Three nodes: A, B, and C
- R₁ connects node A to ground
- R₂ connects node A to B
- R₃ connects node B to ground
- R₄ connects node B to C
- V₁ between ground and A; V₂ between C and ground
Goal:
Find voltages at nodes B and C.
Step-by-Step Solution:
Let’s define:
- Node A: V_A = 10V (from V₁)
- Node C: V_C = 5V (from V₂)
- Node B: unknown → call it V_B
Apply KCL at node B:
Current from A to B through R₂:
Current from B to ground through R₃:
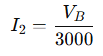
Current from B to C through R₄:
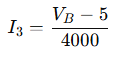
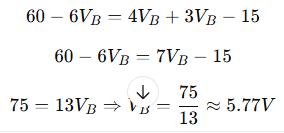
KCL:
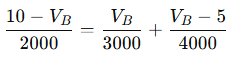
Let’s multiply both sides by the least common denominator: 12000

Expand both sides:
Why Use Node Voltage Method?
- It’s efficient for circuits with multiple nodes and few loops.
- It reduces the number of equations compared to mesh analysis.
- It’s highly useful in computer-based circuit solvers and simulators.
Pro Tips
- Always double-check your chosen reference (ground) node.
- Redraw messy circuits to identify nodes clearly.
- Combine resistors in series/parallel where possible before applying the method.
Final Thoughts
Once you get comfortable with writing and solving node equations, the Node Voltage Method becomes second nature. Whether you’re solving homework problems or analyzing real-life electronic circuits, mastering this method will save you time and effort.
If you found this helpful, stay tuned — we’ll dive into the Mesh Current Method next time with the same example-based breakdown!
Leave a Reply