
If you build electronic circuits, you will eventually use a PNP transistor. It behaves differently from an NPN transistor. To use it properly, you must understand its real wiring configuration.
🔌 What Is a PNP Transistor?
A PNP transistor turns on when the base voltage is lower than the emitter. In contrast, it turns off when the base is at a higher voltage. This feature makes it useful for high-side switching.
Also, it allows current to flow from the emitter to the collector. That’s the opposite of an NPN transistor, which draws current from the collector to the emitter.
🛠 What You Need
Before you begin wiring, prepare the following components:
- One PNP transistor (e.g., 2N2907)
- A 1kΩ base resistor
- A resistive load (such as an LED and resistor)
- A DC power supply (e.g., +12V)
- Ground connection (GND)
✅ Real PNP Transistor Wiring Diagram
This diagram shows how to wire a PNP transistor correctly:
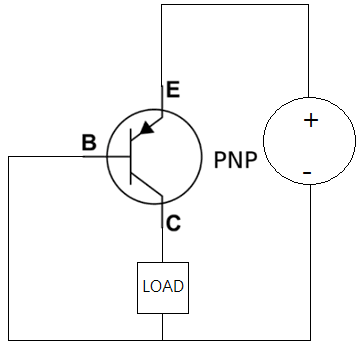
In this setup, the emitter connects to the positive voltage. The base connects to ground through a resistor. The collector connects to the load, which then goes to ground.
⚙️ How It Works — Step by Step
- The emitter connects to +V (positive supply).
- The collector connects to the load, which connects to GND.
- The base connects to GND through a resistor.
When the base drops about 0.7V below the emitter, the transistor turns on. As a result, current flows from the emitter, through the collector, and into the load.
This setup is ideal for controlling the positive side of a circuit.
💡 Helpful Wiring Tips
- Always use a resistor on the base to limit current.
- If your control source is open-collector, add a pull-up resistor.
- Double-check the pin layout of your transistor before soldering.
- Never short the emitter directly to ground—it may burn the part.
- Make sure the control voltage is low enough to turn the transistor on.
🔚 cONCLUSION
Knowing the real wiring configuration of a PNP transistor makes your projects safer and more reliable. With the right connections, you can use a PNP transistor for power control, switching, and more.
Keep your circuit simple, test often, and wire with confidence.
Leave a Reply